


To create a new, empty layer, please click once on this icon. This opens a dialog box in which you can set the parameters of the new layer.
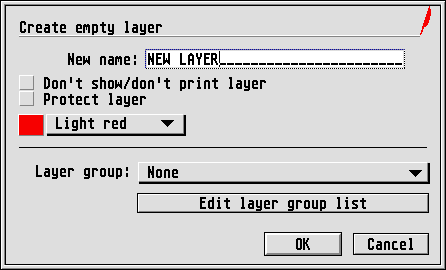
Here is a description of the individual parameters:
You can (and should) give each layer its own, unambiguous name. It does not matter here whether you use the same layer names on page 1 as on page 42, say – the layers are still unambiguously differentiated.
If you set this switch, then this layer will neither be displayed in the document window nor output with the rest during printing.
If this switch is set, then the layer is protected against any changes. This means that all frames of this layer will have frame protection activated automatically, which you would otherwise have to set individually in the Frame editing module.
For better differentiation and help in organizing, you can
asssign colours to the layers used, which you can select in this popup
menu. There are 16 colours available for selection. This colour
identification is not just useful in the layer list, but is also shown
in the document window: You will see that all frames that do
not belong to the active layer display a corresponding colour
patch with a small i
in the lower left corner, which should
inform you to which layer this frame belongs.

If you have defined layer groups (see below), you can assign the layer here to one of the existing groups. When you have assigned layers to a layer group, the individual layers are no longer visible in the layer list and also adopt the colour ID that you have assigned to the corresponding layer group.
If None
is selected in the popup menu, then this layer will
be handled individually and also remains visible and selectable in the
layer list. If the layer was previously assigned to a layer group,
then it will have its own layer colour ID restored.
The editing of layer groups can be reached via the Edit layer
group list
button. It is described further below.
